Monday, July 28, 2008

Week 19 - Setting Up a Local Site

You need to designate a local site to use as your home folder for keeping all website files.

First of all you need to create the local folder. On your USB stick create a folder for your website using the format: 'surname' 'first initial' underscore website. For example:
campbellc_website

Within this folder create four more folders titled index, portfolio, contact, links.
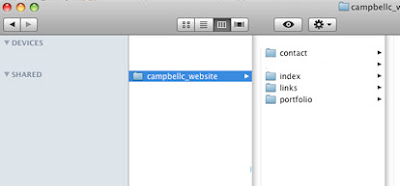

All the files used for your website including image files etc will be placed into these folders. You can add extra folders depending on how you wish to organise your site.

**Tip: When saving folders for the internet remember never to use spaces (always use and underscore) and all letters should be in lowercase.

Now open Dreamweaver:
  • From the menu bar select Site> New Site. The Site Definition wizard will appear, please make sure you have the BASIC tab selected.
  • Type a name for your site. Preferred format is 'surname' 'first initial' underscore 'website'. Eg: campbellc_website.
  • Click NEXT
  • Dreamweaver will ask you if you want to use its server technology tools. Please click NO at this stage.
  • Click NEXT
  • In the next window make sure the first tab is selected as you want to edit local copies on your machine. The most important part is to tell dreamweaver where to locate your Local Site folder. In the same window click the blue folder to the right hand side of the dialog box and search for your USB stick and then find your website folder that you have recently created. Click CHOOSE to select your folder.
  • Click NEXT
  • It will then ask you how do you connect to your remote server. At this stage we want to select NONE
  • Click NEXT
  • Click DONE
You have now designated a local folder to use as the 'home' folder for your website. Every single file (including image files, html files etc) that you use on your site needs to be placed into this folder.

Monday, July 14, 2008

Week 18 - Website basics

Some examples of web portfolios:
http://joesorren.com


Today is an initial introduction to creating a basic web page. We will:
- Insert text
- Insert a table
- Create a link to an external web page (e.g. your blog)
- Insert an image (the image will be re-sized in photoshop to the appropriate pixel dimension)
- Creating an image rollover (this is a good technique to use for portfolio thumbnails, as the viewer moves their mouse over each thumbnail they change from full colour to much lighter)

Sunday, July 13, 2008

Week 17 - Introduction to Dreamweaver

During the next term you will be creating your own website* to use as an online art portfolio. The program you will use to create your website is called Dreamweaver.

Your website will be made up of four pages:

  • An index page – this is the first page that people see when they type in your website address.

  • A portfolio page – this is where people will view your online portfolio of images.

  • A links page – here you will create a list of links to other websites/blogs etc that you enjoy looking at.

  • A contact/info page – this is where you will show your contact details (eg. email address) and also have a link to your CV.

This first lesson will be a brief introduction to the basics of Dreamweaver:

  • How to open a basic html page
  • Viewing the properties box
  • Inserting text
  • Inserting a table
  • Viewing your page using a web browser such as Firefox or Safari
The second half of the lesson you will have a chance to finish your artist book, update your blog or start looking around the web for inspiration for your own online portfolio. Remember you will need to keep your website simple and easy to navigate, however there is still room for creativity!

*For this exercise your website will never actually be uploaded to the web, however you will be creating a fully functioning website. To upload your site to the web you will need to purchase both a domain name and web hosting. This is something you may want to think about in the future.

Wednesday, July 9, 2008

Semester Two

Classes return Monday July 14th 2008.

See you there!